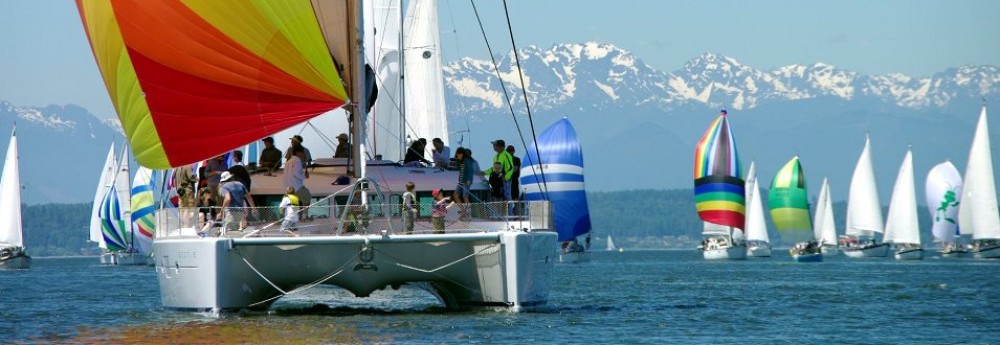
 Here is a recap of how Sophie and her gear fared on our recent Transatlantic passage from the Canary Islands to Barbados. We covered over 2,700 nautical miles in 16 days and 7 hours, averaging slightly above 7 knots for the trip. We sailed straight downwind on the rhumb line for 2,000 miles using either a genoa, an 1800 square foot Parasailor spinnaker, or a 2100 square foot symmetric spinnaker. We put away our mainsail on the second day of the passage and never used it again. We only used our diesel engines for sail changes and for a brief AIS signal investigation in the middle of the Atlantic. We had a crew of eight including our children Leo and Hazel, who tried to do school every day.
As you know from our previous posts, Jenna and I spent a lot of time and money getting Sophie ready for this passage. Our catamaran is 10 years old, and even though Jenna and I thoroughly reviewed and checked every system on the boat, some of the systems are now 10 years old as well. I was a little worried something was going to break on this trip despite our preparation.
All-in-all Sophie performed quite well. A few things broke, but most systems worked as planned. There are lessons we and everyone else can learn from our recent experience.
What Broke
Genset Compartment Air Vent Plug
This may sound like a minor item, but it wound up causing significant problems for us during our first week offshore.
Sophie has a big genset compartment located between the mast and the anchor windlass. This space is the home for our genset (generator), a locker for our 2 LPG bottles, and for half of our navigation electronics. We also store our four folding bicycles here. There is a lot of space.

This has always been a relatively “wet” compartment because water that collects in the adjacent anchor and rope lockers drains through an opening located directly underneath the marine plywood deck that supports the genset. In rough seas, water can get splashy down there and spray the walls of the compartment, including the aft bulkhead where the electronics are mounted.

To avoid this splashiness, I place towels under each side of the genset deck. This keeps the compartment dry. But on this trip, something new was happening. When Lagoon built Sophie in 2007, they installed a vertical pipe in this compartment.
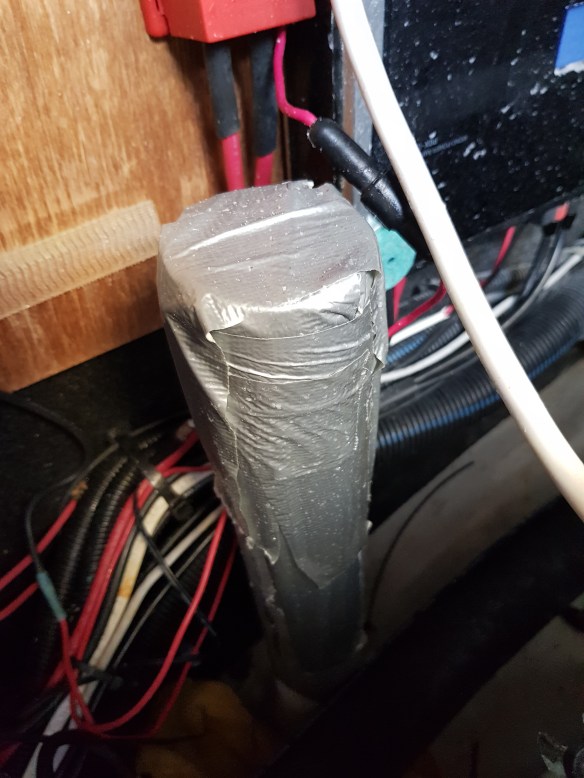
This pipe serves as an air vent for generators installed in the factory, because EU regulations require any compartment in a boat with a diesel or gasoline engine to have an air vent. Since we installed our generator as an aftermarket option in the US, Lagoon simply sealed the vent with a water-tight cap in the factory. This worked fine until this trip, when I noticed that somehow this cap had shrunk, allowing water from big waves under Sophie to splash up through the pipe and around the cap to hit me in the face and spray the bulkhead electronics with a fine mist of seawater.
I was able to fix this leak with a plastic bag and a lot of duct tape, but before I did so it caused some additional problems that I describe below.
Failed Bosch Relay
We have a single switch at our nav station that we use to turn on our navigation electronics, and this switch powers a 12 volt relay in the genset compartment which powers all of the Raymarine electronics located there, including our GPM400 navigation computer, our wind/speed/depth sensors, and the Raymarine Seatalk networks that tie our navigation systems together.

This relay failed, causing the Raymarine systems to fail. I was able to temporarily bypass the relay (just like in Star Trek) and then replace the failed one with a spare. But this didn’t solve the all of the Raymarine problems were were experiencing
Failed Raymarine SeaTalk Networks
Sophie has 4 SeaTalk networks concatenated together: an original SeaTalk network, 2 Seatalk NG networks, and a Seatalk HD network. Three of these networks began simultaneously failing, causing us to lose our autopilot, our wind and speed instruments, and our nav display (which flashed a “keyboard disconnected from display” error message while blaring a very loud alarm.) This was all happening on just the third day of the trip, and I was privately assuming we were going to have to abandon the passage and hand steer the 400 miles to the Cape Verde Islands where we would have to repair the problem. That would have been bad, because our crew would have had to fly home from Cape Verde and we would have to remain there for an indeterminate amount of time while fixing the system.
There are three power supplies to the SeaTalk and SeaTalk NG networks on Sophie, and each of these is protected by a 5 amp fuse. One of these fuses is located in the controller for our autopilot (located in the very dry battery compartment in our aft cockpit) and the other two are located on the fuse board in the genset compartment. Every time I tried to isolate the problem and then turn the navigation electronics on, all three fuses would simultaneously blow. I was running out of fuses. It was a problem.
I was finally able to isolate the problem to this SeaTalk NG 5-Way Connector in the genset compartment. There are multiple connectors like this throughout Sophie. This one connects the sensors for our wind, depth sounder, and boat speed with the rest of the network.

Rich and I dried the connector out overnight, cleaned it with electrical spray, pointed a hair dryer at it, and left it out in the sun. Regardless of what we did, if we connected it back to the network, all 3 fuses would blow. If we left it disconnected, we were able to get autopilot and nav display working but not the wind/depth/speed sensors. I assumed we would sail this way for the rest of our passage to Barbados. I knew I didn’t have any spare Raymarine networking hardware on board (although I thought about buying some in Las Palmas but was too busy!!!), I thought I might have a spare SeaTalk cable in the box our AIS antenna came in when we bought that a year ago. So I dug out that box and opened it up. What did I find? A brand new SeaTalk NG 5 Way Connector! Problem solved! I was very happy, and Jenna and I are going to look at replacing our entire set of navigation electronics over the course of the next year. It’s time.
Failed Raymarine Keyboard
The RayMarine Command Center keyboard for our salon nav station is now toast. It shared a SeatalkNG 5-way connector with a power supply coming from the genset compartment, and I assume that after I ran out of 5 amp fuses and switched to 7.5 amp fuses, it got fried during one of the shorts. Fortunately we have a second navigation display and keyboard at the flybridge, and these functioned properly for the remainder of the crossing.

Raymarine doesn’t make these keyboards any more, but I was able to buy a used on eBay for $200. Some friends from the US will bring it with them when they visit us in Martinique next week.
Burned Our Proficient Amplifier
Sophie has a pretty impressive stereo system, with four linked speaker zones each controlled by a separate keypad and integrated together via an amplifier in the genset compartment. This amplifier is located on a shelf directly above the failed plug on the unused genset air vent pipe. One evening during their watch, our crew Jess and Kate smelled something burning. Very few things can be as exciting as discovering a burning smell on a fiberglass boat at night in the middle of the Atlantic ocean, because fiberglass can melt when it burns. So Jenna and I wandered around Sophie sniffing for the source of the burning smell. We tried the bilges, the battery compartment, and the engine rooms. I was worried that in all of the wire pulling Kate and I did when we installed a new VHF radio right before our departure, we created a wire chafe issue in an inaccessible place that was now smoldering. That would have been really bad. But it made sense that given all of our other problems with the genset compartment that the smell was coming from there. I sniffed around and concluded that the smell was coming from the stereo amplifier.

I unplugged the unit and the smell went away. Big relief! This problem has a silver lining for us, because Jenna and I have been looking for an excuse to upgrade Sophie’s stereo system. We now have one.
Burned Out Dishwasher
This turns out to be unrelated to the electrical problems in our genset department. Our trusty Fisher & Paykel dishwasher finally bit the dust after 10 years of service. This two drawer unit has a design where the unit’s AC electrical circuit board is located directly below the lower drawer, and when that drawer occasionally overflows with water, the circuit board gets wet. This has happened to us many times, and I replaced the circuit board in Genoa earlier this year. When this flooding happens, Fisher & Paykel recommends that you dry the circuit board with a hair drier and then let it sit for a few days. The problem usually goes away.
Not this time. Two days before we left, we smelled a slight burning smell in the galley, and we assumed it was from a heated ping pong ball in our sous vide cooker (see below.) We now know that it was coming from the circuit board on the dishwasher.
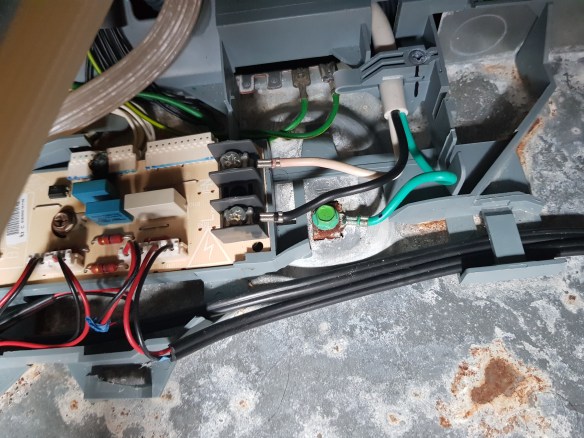
You can see something resembling a cigarette burn right next to the two boxes on the circuit board pictured above. I was so busy with other departure-related problems that I didn’t have a chance to investigate this problem until we were four days out. The burn mark means that the circuit board is clearly toast, and we are not going to continue buying expensive replacement parts for a ten year-old appliance. This failure also meant that WE HAD TO HAND WASH ALL OF OUR DISHES FOR THE ENTIRE PASSAGE! The horror. We will buy a new dishwasher when we get to the US later this spring.
Missing Batten!
On the morning of our first full day of sailing, Rich and I noticed that our brand-new square-topped mainsail that we folded on in Gibraltar was missing a batten! This is one of the weirdest things that has happened to us on Sophie. Our new mainsail requires shorter battens than our old mainsail, so we cut our old battens in Gibraltar with a saw and reused them on the new sail. We then noticed on our sail from Gibraltar to Madeira that one of the battens looked loose in its sleeve, so we tightened the screw in that batten’s holder on the sail’s leech in order to fix the problem. I now assume that on our subsequent sail from Madeira to Lanzarotte (where we had 2 reefs in the main in 25 knots of wind on the beam), the tip of the batten worked its way out of the batten holder, then worked its way out of a slot at the end of the batten sleeve and subsequently fell into the Atlantic Ocean without our noticing it. Weird.
 I considered taking one of the battens that supports our mainsail cover (pictured above) and cutting it to serve as a temporary replacement for the missing sail batten. But at this point in the Barbados passage we were about to turn right and sail straight downwind for 2,000 miles without using the mainsail. So I decided against doing the temporary replacement. I did, however, realize that the mainsail cover batten sleeve has enough extra room to store a spare full-length batten. We plan to do so. More spares are a good thing.
Mainsail Cover and 3rd Reef Chafe
Our new mainsail design has reef points located farther forward on the sail than our old mainsail’s design, and this created a problem when paired with our existing mainsail cover. Each of the sail’s three reef lines terminates with a loop around the boom for strength. Here is a photo of our third reef line while the new mainsail is in its cover.

When reefed, the line is supposed to go straight up through slots in the mainsail cover, turn at a 90 degree angle at the reef point, then run directly parallel to the boom until it meets a sheave at the end of the boom that then enables the reef line to turn 180 degrees and run inside the boom towards the mast. On our first night at sea, we dropped down to three reefs in the main for safety, and soon realized that the third reef point on the new mainsail was located about a meter forward of the reef line slot in the sail cover. So instead of forming a 90 degree angle, the reef line was pulled forward, looking like a sling shot about to fire. This caused chafe on the reef line. On the luff side of the mainsail, the third reef point is a snaphook attached to the sail with a length of nylon webbing. In trying to address the problem with the slingshot angle on the leach, I tightened the halyard to the extent that it caused the nylon webbing to snap.
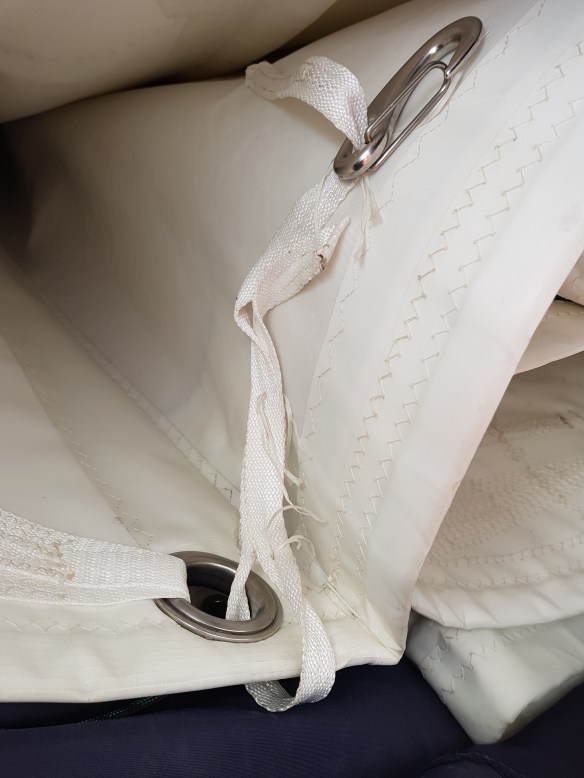
At the time I was able to address this problem with the snaphook by using a length of rope to secure the third reef to the boom. We will have alterations made to our sail cover to fix this problem in Martinique. We also snapped the mainsail cover zipper tape where it is attached to the end of the mainsail cover. Chafe is a beast on passages.
Parasailor Processes and Chafe
Jenna and I bought a second-hand Parasailor spinnaker this past summer in preparation for our Atlantic passage.

Parasailors are cruising spinnakers with a big airfoil in the middle of them. The idea behind this sail’s design is that the foil provides stability in light air and serves as a pressure relief valve in gusts, requiring less overall care and feeding than a traditional spinnaker during long offshore passages. Jenna and I wanted a sailing solution for passages where we head straight downwind in winds from 15-25 knots, a speed that is too much for our existing spinnaker to safely handle due to its large size. So we bought a Parasailor that is 169 square meters (1800 square feet), a size designed for boats smaller than Sophie. We flew this sail for over 1,000 miles on the passage in winds ranging up to 34 knots and the Parasailor largely delivered exactly what we wanted it to deliver.
However, in hindsight it is quite clear to Jenna and I that we should have invested more time up front in training our crew on how to handle this sail, especially in winds above 20 knots. Rich suffered severe rope burns on his hands on the first night we took the sail down in winds gusting to 25 knots. (Thankfully these rope burns mostly healed during the passage.) We are horrified that someone got injured on Sophie; it’s our first major sail-handling injury in 10 years and 40,000 miles. This experience rattled the crew for the next few days and made us a little gun-shy with regards to this sail. We spent a great deal of time talking about it and even wrote down procedures for raising and lowering the Parasailor. I include these written procedures as an appendix to this blog post.
At the end of the passage we flew the Parasailor for 30 straight hours, averaging over 9 knots during this run. It was either a glorious or extremely uncomfortable experience, depending on your point of view. During this run, we chafed through the cover of our spinnaker halyard, as shown below.

We have chafed through halyard covers multiple times before and know that this could have been avoided if we had simply adjusted the length of the halyard on a regular basis during the run. I thought about it at the time but didn’t. My bad. Jenna and I will simply cut the chafed part off the halyard and reverse it on the mast in order to fix this problem.
Also, we suffered some spinnaker sheet chafe when the Parasailor guys were rigged too short because the sheets would rub against the threads on the outer shroud fittings.

Rich was able to create a temporary fix for this with some extra hose and duct tape. We’ve used chafe protection before in various configurations on previous passages. It is important to constantly check all contact points and assume chafe will happen on a long passage.
Starboard Engine Shifter Linkage
As Jenna mentioned in her blog post earlier this week, in the middle of the Atlantic we dropped the sails and turned on the motors in order to track down a mysterious weak AIS signal that popped up on our navigation systems. It turned out that the signal came from two Frenchmen in a rowboat who were crossing the Atlantic in order to raise awareness for Parkinson’s disease. Right as we were idling Sophie near the rowboat, our starboard engine shut off and a loud alarm beeped at us from the ZF electronic engine controls on our flybridge. What unfortunate timing! It took us 20 minutes to isolate the problem, which was a bent shifting cable that ran from the ZF controller to the shifting lever on the starboard engine saildrive. We had experienced the same problem in Madeira when our engine mounts broke, and it was an easy repair.
Starboard Saildrive Frothy Milkshake
While I was down in the engine room trying to diagnose the shifter problem, I checked the oil in the starboard saildrive and saw that it looked like a frothy green milkshake. This is a clear sign that sea water is leaking into the saildrive’s gearcase. This is not an uncommon problem for Yanmar SD50 saildrives, but it is the first time this has happened to Sophie. I serviced the engines before departure in Las Palmas, including changing all filters and fluids. We haven’t changed the seals in our saildrives in almost 6 years though, and we are clearly due to do so. There is an excellent shipyard in Martinique, and we will haul the boat there later this month to make a repair. It’s been 26 months since we last hauled Sophie (in Phuket!), so we will get her bottom painted as well.
Raymarine VHF Antenna
During our encounter with the French rowers, they told us that they had hailed us on the VHF radio, but we never responded. This seemed odd to me since we had just installed a new VHF radio before departing Las Palmas. I opened up the electronics area in the salon to find that our VHF antenna cable had popped out of the antenna socket on the new radio.
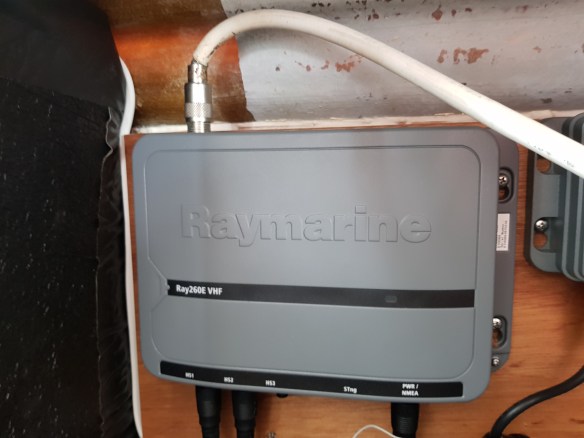
Here is a photo of our brand-new Ray260E VHF radio with the tight antenna cable. As you can see, the plug for the VHF antenna is on the upper left side of this unit. On our older Ray240 radio, the antenna plug was located on the lower right side of the unit. I love it when manufacturers design upgrades like this! Unfortunately, there was absolutely no slack in Sophie’s VHF antenna cable in this compartment, and I mistakenly thought the cable would work with the tight stretch shown above. It clearly didn’t. Since arriving in Barbados, I have rearranged the location of the electronics boxes in this compartment to shorten the VHF antenna cable run. I also resoldered the antenna cable plug to the antenna cable. This shouldn’t be a problem any more.
Broken Weld on Bow Pulpit
Sophie’s bow pulpits have little stainless steel attachment points welded to them for securing lifelines. These have been bent for many years, and one of them finally snapped during this passage, likely due to pressure from the spinnaker guys.

We will get this fixed in Martinique.
Well, that summarizes my list of the major things that broke during the passage. Now let’s move on to the boring-yet-happy part of the post.
What Worked
Let’s start with the most important one:
Sophie’s Power Plant and Watermaker
Sophie’s electricity generating systems — genset, charger/inverter, alternators, wind mills, and solar panels — worked flawlessly for the entire passage.

This is the first time this has happened to us on a passage, and we are quite grateful. Our watermaker worked flawlessly as well, producing 40 gallons per hour every day when we ran it. In terms of the electronics, we installed new batteries in Sicily a year ago, and in the process we permanently removed the cover to the battery box along with the little storage shelf Lagoon installed above the battery box cover. I think this makes it much easier for this compartment to stay cool, reducing the risk of temperature-related electrical faults. This change also makes access to Sophie’s electronics nervous system much, much easier. I wish we had cleaned this area up 5 years ago.
We achieved this performance excellence in electronics while drawing an average load of 40 amps/hour from our 12 volt house battery bank. Why such a heavy electrical load? For starters, our Raymarine G series electronics system is an energy pig, requiring cooling fans in the main GPM400 processor unit and in the two big display screens. We also adjusted the sensitivity rating of our Autopilot from “5” to “9” while also using Wind Vane mode for the first time. These changes enabled us to maintain an excellent straight course while sailing downwind with swells coming from an angle. This approach uses much more electricity than running with the autopilot set at “5”, but I will gladly trade electricity (in terms of diesel fuel burned by the generator) for course accuracy and comfort over a long passage.
Another factor in our heavy electricity consumption: 8 souls on board for 17 days, frequently opening refrigerators and charging mobile phones and computers multiple times a day. Don’t underestimate the heavy load personal electronics can place on a boat’s electrical system! Right after our crew of four plus Jenna departed the boat last Saturday, I noticed that our hourly draw on the house bank dropped by 10 amps! I am not complaining, because we have a heavy-duty electrical system on Sophie for this very reason.
Toilets! Toilets! Toilets!
This one might even be better. If you add in pre- and post-passage time, the 8 souls lived on Sophie for 21 days. If you assume 4 toilet flushes per person per day (peeing overboard is against the rules on our boat), then Sophie’s sanitation systems successfully executed 672 flushes without a single problem. GIVEN OUR PAST HISTORY WITH TOILET ISSUES, THIS IS NOTHING SHORT OF A MIRACLE. No clogs. No burned-out macerators. No Barbie shoes or glitter dust or other items that should never go into a marine toilet. Nothing. A miracle. I’ll leave it at that.
Zoom Sails Genoa
We only used our new mainsail for a day or so, but our new genoa from Zoom Sails worked like a champ throughout the passage.

We rigged the genoa using the spinnaker sheets to achieve a better angle for running straight downwind and were quite happy to use this sail in forecasted winds above 22 knots. We also used it at night for half of the passage. Our speed with the genoa dropped 1.5 to 2 knots compared to our speed with either spinnaker, but the crew’s comfort level tripled when we had this baby up. We even averaged 6.7 knots of speed over the course of an entire night with this sail up.
Port Townsend Sails Spinnaker
Sophie has a 2100 square foot symmetric spinnaker that was made for us by Carol Hasse and crew at Port Townsend Sails ten years ago.

We love this sail and flew it for three and a half straight days at the end of the passage, covering well over 600 miles in the process. It was awesome and relaxing and safe and fast during this time. It is a great downwind solution for light air.
Sous Vide Pre-Cooked Meals
Jenna and I bought an Anova sous vide cooker to pre-cook meat for the passage. It worked superbly and will change how we prepare meals for passages from now on.

Sous vide cooking involves immersing sealed bags of food (in our case, meat) in a temperature controlled water bath so the entire contents of the bag cook at a precise temperature. This is the approach most US steak restaurants use to cook steak: they precook the beef in a water bath and then sear it at a very high temperature right before serving to the customer. In Sophie’s case, we pre-cooked bags of beef tenderloin, pork tenderloin, turkey, and chicken, and then popped them all into the freezer. The ping pong balls help reduce water evaporation during the water bath cooking process.
During the passage, we simply pulled packages of precooked meat from the freezer and then heated them up with sauces and spices to easily create hearty meals for a hungry crew. It was a great way to feed a crowd with minimal effort while at sea.
Jamón ibérico
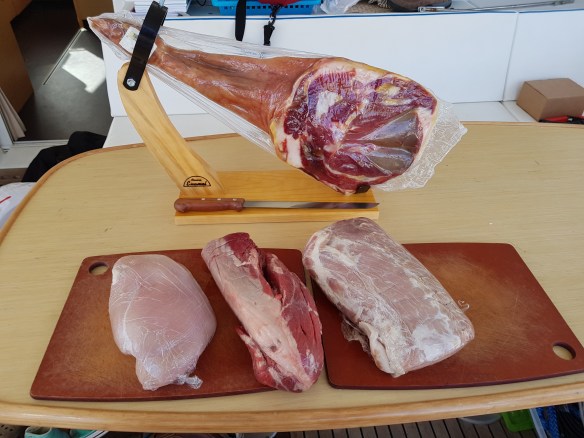
You may have heard that Spain produces the best cured ham in the world. Jenna and I decided that we would provide a full leg of this for our crew on the passage. When else in our lives will we be departing Spain on a transoceanic passage?
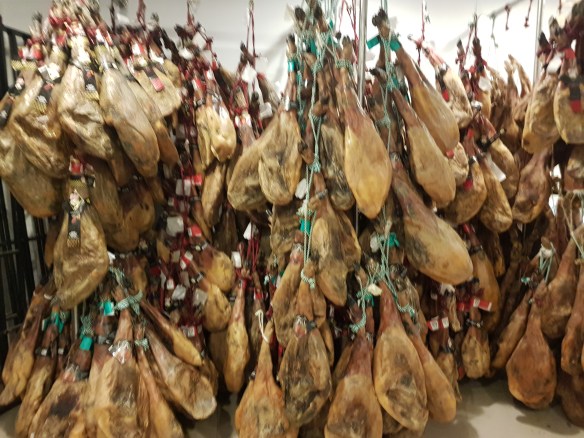
Fortunately for us there was a jamón store one block away from our marina in Las Palmas. I went top-shelf and bought a 7 year aged, 10 kg specimen. And we didn’t just buy a leg, we also bought a jamónero (ham holder) and a cuchillo de jamón (ham knife.)

This entire setup brought great joy to the crew. We had ham for breakfast, ham for lunch, and ham for snacks. And this doesn’t include the 10 kg of prosciutto, smoked ham, and Speck that Jenna and Jess were buying while I was out getting the jamón.
 The result was great fun with pork. There was no shortage of protein on this passage.
Guest Teachers
Normally Jenna, in addition to all of her other responsibilities as a co-captain of Sophie, is responsible for conducting Sophie School during passages. But halfway through this trip, Kate and Jessica volunteered to take over the operation of Sophie School for Hazel.
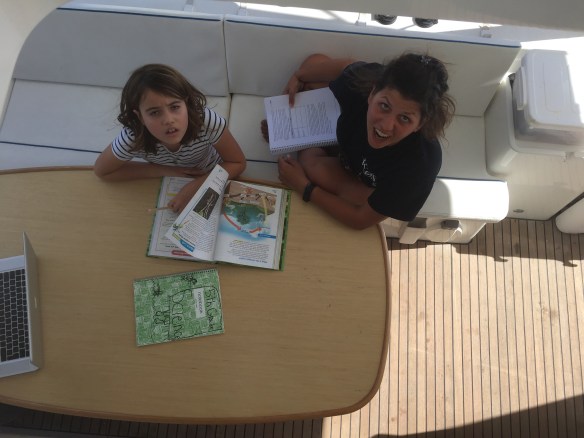
What an unexpected gift of extra free time for Jenna! The guest teachers even implemented “Deutcher Donnerstag” (German Thursday) where Hazel had to conduct Sophie School as if she was a student in Germany. This involved running school on a precise schedule and assigning any remaining work from a lesson as after-school homework. They scheduled a 20 minute outdoor time after the first 2 lessons, and they added a new class called “Uncle Richy’s Sailing School” where my brother would quiz Hazel on the name and function of different pieces of Sophie’s sailing gear and rigging. Once the novelty of all this wore off, Hazel began treating her new teachers with the exact same levels of attention and respect that she shows her mother during regular sessions of Sophie School. Hazel loved the effort and attention that Kate and Jess put into the school and hopes they rejoin Sophie soon as regular guest teachers!
Well, that wraps up our discussion of what we learned during our passage. We love our life, we love our boat, and we love the fact that we can rely upon friends and family to join us as great crew wherever we are in the world. We are indeed very lucky.
#####
Appendix 1
Parasailor Initial Sophie Setup
Version 1.0
Goal:
Our goal is to safely raise the Parasailor in one fluid, coordinated motion. We do this by rigging the sail beforehand in a way that eliminates all potential tangles and snags, enabling the sail to quickly open with a “pop” as the sock is raised. Throughout the entire process no lines trail in the water in a manner that endangers Sophie’s propellers.
Crew:
1-2 people on foredeck
1 person on port winch
1 person on starboard winches
1 person at the wheel
Pre-Start checklist:
- Engines on
- Sheets and halyard on winches
- Boat positioned with wind directly downwind
- Clear understanding of roles and responsibilities
Setup Process
- Rig port and starboard guys so they run from the bow cleat then directly under the pulpit seat then through the snatch block then to a length one meter past the forestay. Secure one end of the guy to the cleat and the other end to the crossbeam stay.
- Rig port and starboard sheets so they run from the crossbeam stay then above and outside the lifelines and shrouds then under the last stretch of lifeline then through the sheet block then up to the sheet winches. Secure one end of each sheet to the crossbeam stay and the other end to each of the winches. Make sure there is no slack in either sheet.
- Remove Parasailor from the sail locker and lay out on the starboard deck from the crossbeam to the shrouds, ring foreward.
- Arrange sock so there are no twists, meaning that the green and red ribbons on either side of the sock run true from the ring to the head.
- Arrange foot of the sail so that the white ribbon runs true from the starboard to port clue.
- Ensure that the green and red sock harness is behind the sail and the sock ring.
- Flake the white sock rope along the starboard side of the sock while on deck from the ring to the head, ensuring the rope runs true and that the blue line attached to the top of the sock rope is not twisted around the head of the sail. The entire length of sock rope is clearly visible on deck from harness to head.
- Attach starboard guy and sheet to the starboard parasailor clue ensuring that the guy is attached BELOW the sheet and that both lines run true.
- Attach port guy and sheet to the port parasailor clue ensuring that the guy is attached BELOW the sheet and that both lines run true.
- Attach the halyard to parasailor clue, ensuring that the halyard is outside the genoa sheets and runs true to the masthead.
- Assess the entire rig and ensure that all rigging lines are clear from potential snags and all lines run true.
- Raise the Parasailor halyard to within 1 meter of the masthead, relying on guidance from the deckhand while the deckhand holds the sock rope
- Position sock rope in the center of the foredeck and raise the sock ring all the way up, maintaining loose tension on the sock ring rope slack.
- Trim sheets as required.
- Secure sock rope to starboard coach roof handrail.
#####
Appendix 2
Parasailor Takedown on Sophie Drill
Version 1.3
Goal:
Our goal is to safely lower the Parasailor and stow it in the starboard sail locker in one fluid, coordinated motion. We do this by releasing all pressure on the port spinnaker sheet and guy, essentially turning the sail into a “flag.” Once this happens, the foredeck lowers the spinnaker sock over the sail without the need for excessive force or drama, depowering the sail for easy lowering and stowage. Throughout the entire process no lines trail in the water in a manner that endangers Sophie’s propellers.
Crew:
1-2 people on foredeck
1 person on port winch
1 person on starboard winches
1 person at the wheel
Pre-Start checklist:
- Engines on.
- Sheets and halyard on winches
- Boat positioned with wind@ 120°-160° from port
- Clear understanding of roles and responsibilities
Takedown Process
- Loosen port spinnaker guy 5 meters and then secure to cleat.
- Untie sockline and organize for lowering.
- Loosen the port sheet until sail collapses and then secure the last 2 meters of sheet to the winch.
- Winch starboard sheet in 3-6 meters so that the starboard clew is 1-2m above the lifeline, doing so in a way that avoids creating tension with the starboard guy while also keeping the sheet secured to the winch.
- Pull down the sock as the sail collapses in a manner that doesn’t require body weight or excessive force. Please note that the sock ring can encounter difficulty as it passes over the parasailor foil. Do not try to “fight” the rope. If there is too much tension, let go of the line, reset, and begin again.
- Loosen the sheets as needed as the sock lowers.
- Once the sock is fully lowered, lower the halyard just enough so that the sock ring lies on deck.
- Open the starboard sail locker hatch.
- Lower the halyard with guidance from the foredeck as the sail is stowed in the locker while insuring that the sock rope remains on deck.
- Unclip halyard and attach to lifeline.
- Untie and secure the sheets and guys to lifelines.
- Complete stowage of the sail in locker and secure hatch.
- Cleanup foredeck of any stray lines.
- Attach halyard shackle to base of mast.
- Secure flybridge sheet ends to rails.
#####
Appendix 3
Photo of Katie Helping Take the Trash to Shore

I think my dad will enjoy this photo of his granddaughter.
#####

